Emburse Navigation Guide
Emburse is the university’s comprehensive travel expense reimbursement tool. This system allows university employees to manage Pre-Approvals, track Expense Reports, run reports, and submit and receive reimbursements in the most cost-effective, timely and efficient manner possible. VCU travelers who paid for pre-authorized, business-related travel expenses with personal funds may be reimbursed in accordance with policy.
Reimbursement requests should be submitted within 30 days from return of travel. All reimbursement requests must be accompanied by receipts and/or supporting documentation. Failure to include any required documentation may unnecessarily delay the reimbursement.
Steps to process reimbursements through Emburse
Collect all receipts and/or supporting documentation
Although not all-inclusive, the following information is required for expense reimbursement and must be submitted:
- Reason for travel and any unusual fees such as charges for changing reservation/ticket
- Internet confirmation pages of expenses if online methods were used to procure services (If a Boarding pass is not available, itinerary and proof that the trip was taken is required)
- Reason for business phone calls or facsimiles
- Itemized receipt for lodging or comparative statement if alternative lodging is used (i.e., apartment)
- Itemized receipts for business meals and overtime meals.
- Final itemized vehicle rental and gas receipts
- Approval for use of private or State-owned aircraft
- Receipts required if claim for the following expenses is more than $75:
- Taxi
- Shuttle
- Metro
- Limousine
- Parking
- Tolls
- Airline baggage fees
- Business Center (i.e. fax, printing)
- Telecomm (i.e. phone calls, Internet)
- Laundry
- Registration fees
- Miscellaneous
Generally, credit card statements are not sufficient documentation to support the reimbursement of travel expenses.
Missing receipts
If a receipt is missing altogether, the traveler must provide proof of payment in the form of a credit card statement or copy of front and back side of cashed check and submit a written memo detailing why the receipt is not available.
If a receipt is missing and proof of payment is not available, expenses must be charged to local funds and approved by the VP.
If a situation arises in which an itemized receipt is not available for a business meal, a written explanation stating whether or not alcohol was purchased is required.
- If alcohol was not purchased, the amount may be placed on state funds
- If alcohol was purchased, the entire amount must be placed on local funds
Submit the reimbursement through Emburse with receipts and/or supporting documentation.
Emburse FAQs, training and helpful resources
FAQs
Delegate
-
Why am I receiving delegate email notifications when I was not the specific delegate that created the Pre-Approval or Expense Report?
If you are set up as a delegate, then you will receive email notifications for all users in which you are set up as their delegate. Delegates cannot opt out of receiving the email notifications. The only option is to opt out of ALL notifications, but then you would not receive notifications on your own Expense Reports or email approvals.
-
Why don’t Pre-Approval requests go to my Vacation Approval Delegate when activated?
Vacation Approval Delegation does not extend to Pre-Approval.
-
Who can I set up as a delegate?
The following employees have a profile in Emburse and thus, can use the delegate functionality: classified, faculty (adjunct, admin, teaching), hourly, graduate assistants, post docs, and select affiliates that are in operational roles. People who are with MVCH or MCVP and are EXAF in Banner can access Emburse. If someone is in the Generic AFPR role, they will not be able to access. Departments can either change the individual's status in Banner to EXAF or process as a non-employee reimbursement. Students and student workers do not have profiles in the system.
Pre-Approval
-
If my dates of travel change from my approved Pre-Approval, do I need to complete a new Pre-Approval?
When you attach a Pre-Approval to an Expense Report, the only items that carry to the Expense Report are the estimated buckets of spend – air, ground, etc. No other items captured on the Pre-Approval affect the Expense Report – dates of travel, the purpose, even the index code. If the change could potentially affect authorization of the trip, then youcshould complete a new Pre-Approval.
-
What should I include in my Pre-Approval?
The intent of the Pre-Approval is to seek authorization for the trip; therefore, Procurement Services recommends capturing the most complete estimate of all trip expenses.
-
Is policy built into the Pre-Approval?
No. Compliance warnings are not triggered on the Pre-Approval.
-
My Pre-Approval says “Pending Approval”, who is the report pending with?
Under “My Submitted Pre-Approval” click on the Pre-Approval that you are questioning (it will turn blue). Click on the “Tracking” tab, a Tracking data box will appear, click “Show Current”. The system will now show you who your pre-approval is currently pending with.
-
Now that my airfare has been approved on my Pre-Approval, how do I proceed?
Now that your travel has been approved, you can book your arrangements through the Online Booking Tool, or with a Christopherson Business Travel full service agent.
-
How long does my Pre-Approval stay on my dashboard?
Fully approved Pre-Approvals will be visible on your home dashboard for 90 days. After 90 days, it is still in the system, but will only be available to attach to your expense report.
Expense Report
-
Why does the mileage rate default to the higher rate?
Travel Services changed the process for mileage reimbursements beginning April 15, 2013. All mileage reimbursement requests will be reimbursed at the IRS allowable rate regardless of miles traveled. Departments may be more restrictive. Emburse allows for the rate to be edited to accommodate budget restrictions, grant parameters, etc.
-
Why doesn't Emburse deduct for incidentals before calculating the 75% Travel Day?
Travel Services changed the process for calculating the per diem travel day beginning April 15, 2013. The travel day reduction for meal per diem will change to 75%. This calculation does not back out incidentals from the calculations. Emburse is configured to reduce the travel day to 75% when selected.
-
Why can't I look up my per diem rate by zipcode?
Per diem zip code data is not loaded into Emburse. Emburse receives this information from the federal government, and unfortunately, zip codes are not included in the feed.
-
Why do my paid expenses not show on my Dashboard?
The Home Dashboard “Approved for Payment” shows only expenses that have been approved but not exported or paid. Once the expense is exported or paid, it will not show on the Dashboard.
-
My Expense Report says “Pending Approval” who is it Pending Approval with?
Under “My Recently Submitted Expenses” click on the Expense Report that you are questioning (it will turn blue). Click on the “Tracking” tab, a Tracking data box will appear, click “Show Current”. The system will now show you who your expense report is currently pending with.
-
How can I submit my receipts with my mobile?
Use your mobile phone to take a photo of the receipt, then attach it to an email and send it to expensememo@chromefile.com from the phone. Your message should come from your VCU email address. The Subject should be the amount of the expense with no currency symbols.
-
Should we submit non-travel Personal Reimbursements through Emburse?
Yes. All Personal Reimbursement requests must be submitted through Emburse.
-
If the status of my Expense Report reads “Awaiting Receipts,” what should I do?
You will have to upload an image to start the expense routing. Highlight the report and select “Upload Image.” The status reads “Awaiting Receipts” because the “Receipts Attached” box was checked on one of your expense items. To avoid this in the future, uncheck the “Receipts Attached” box if your expense does not require a receipt and you do not plan to attach one.
-
How do I delete an Expense Report?
There are two options, depending on a report’s status. If an Expense Report has been submitted, but not fully approved (i.e. the entire report is Pending Approval), you can click on the Expense Report in your “My Recently Submitted Expenses”. The report should be blue – then click “Recall”. A confirmation box will appear, click “Yes”. You can then click on the report, and the Delete function will be available. Second, if an expense report has been returned you will see the report in your “My Unsubmitted Expenses” with a “Returned” status. You can only delete an Expense Report once you have deleted all expense items within the report. To do this, open the Expense Report, and delete the expense items highlighted in yellow. The yellow indicates that these are the expense items that were returned to you. You will have to delete each expense one at a time. Once all returned expenses have been deleted, you will have the ability to delete the Expense Report. Return to your “My Unsubmitted Expenses,” highlight the report, and click Delete.
-
What does the Status "Exported" mean?
Exported means that the reimbursement has been exported to Banner. Once the Expense Report has been exported, the reimbursements on that file should cut the next business day.
-
My Approver says she has approved my Expense Report, but the status still reads “Pending Approval.” What should I do?
Ask your Approver if she approved via email or within Emburse. If she approved via email, then please ensure that she clicked “Accept” and then “Send” to complete the final approval. If your Approver approved within Emburse, please ensure that she clicked on the “Submit” button to complete the final approval.
-
When I upload a receipt, why does Emburse sometimes cut off a portion of the document?
During the conversion process from a PDF file to a SWF file, the system first creates a temporary jpg image that trims some of the receipt image for quick display. Once the final conversion has taken place and the PDF is now a SWF file, the full image is available.
-
I need to add an expense to an Expense Report that has been returned to me, what should I do?
You cannot add an expense to an Expense Report that has already been submitted. Create a new Expense Report with that expense item and use the Notes section to explain how the new Expense Report relates to the former report.
-
I accidentally chose the wrong Authorized Approver for my Expense Report, so my report was returned. How can I re-route this to the correct Authorized Approver?
You cannot change the Authorized Approver attached to an Expense Report once it has been submitted. Therefore, you will need to create a new Expense Report and route to the correct individual.
Special Processes
-
What do I need to do to pay back my Travel Advance balance?
Any portion of a Travel Advance not spent on business travel must be paid back to the university. The payment can only be made through the Cashier's Office using the Travel Advance deposit form obtained from the Travel Services Team. Once the payment is made, you must email Travel@vcu.edu with your repayment details. Failure to follow the repayment process may delay it from reflecting in your Emburse account.
-
What is the best method to identify a Non-employee Pre-Approval and Expense Report?
Include the Non-employee’s name in the Report Title.
-
Do I need to submit the Guest Reimbursement form for a non-employee who already has a V# in Banner?
Yes, please see the bottom of the form for this information. If the V# already exists, we simply have to add a code in Banner so that the individual is fed from Banner to Emburse. After you send in the form, you will see the non-employee in Emburse the next day.
-
What level of access is required for process travel through Emburse?
Banner access isn't required for submitting Pre-Approvals and Expense Reports through Emburse; however, it would be helpful. If you are responsible for your department's fiscal reconciliation, you may want to consider working with the Controller's office to get Inquiry Access to Banner. Inquiry Access does not offer the full suite of Banner privileges, but it gives you access to Vendor information which is helpful for processing non-employee travel.
Tech Tips
-
Why isn’t my e-mail accepting my approval?
Emburse user profiles are pre-loaded with the employee’s vcu.edu email address. For employees whose emails are sent from a vcuhealth.org or mymail.vcu.edu email address, Emburse is not able to match the email address to the user profile, thus the approval/return via email is not recognized. This can be easily fixed by Emburse users by adding their vcuhealth.org or mymail.vcu.edu email address to their Alternate Email Addresses in their Emburse user preferences.
For more information, view Chrome River Email Approvals pdf.
-
What happens if Microsoft Outlook launches with approval emails?
If Microsoft Outlook launches when you click accept/deny, you will need to change your computer’s default mail client. This is not a change within Emburse. You can change your computer’s mail client in your Control Panel, or you can work with you TS staff to align your computer with the mail client you use (Gmail or Lotus Notes).
-
Do VCUHS employees have access to Emburse?
Please note that we cannot manually set up VCUHS employees in Emburse. Emburse was configured to reimburse VCU employees and guests with VCU funds. Even though VCUHS employees have an eID, their Vnumbers are not captured in CAS, our single-sign on service, so setting them up manually is not possible. If you would like to reimburse a VCUHS employee, please follow the non-employee reimbursement process.
-
Do Adjunct professors have access to Emburse?
If your adjunct professor cannot log into Emburse, please ensure that you have set him or her up with a university email address. Email accounts are not automatically created for VCU affiliates. Please ensure that you have requested a university email account by submitting a helpIT ticket at http://servicedesk.vcu.edu. Once created, the adjunct professor will be able to log into Emburse the next day.
-
Is there anything special to know about Mac and Lotus Notes users?
If you use a Mac computer and you also use Lotus Notes for email, please be aware that Lotus Notes sometimes truncates the Report ID in approval emails making approval via email more difficult. In the second email that generates after you click Accept (the email that you have to SEND to Emburse when approving), Lotus Notes cuts off a portion of the Report ID, so Emburse doesn’t know what expense report you would like to accept. Technology Services has confirmed that there will be no future upgrades to fix this issue, as this system is being retired.To ensure that you can approve your requests, you can either 1) log into Emburse to accept/deny or 2) after clicking Accept, type in the Report ID numbers that were left off in the email. As long as you have the full Report ID in the second email, your approval response will go through.
Emburse receipt and imaging enhancements
Emburse’s image-processing technology makes the process of creating and reviewing expenses fast and effective. Below are enhancements now available within Emburse.
Guidance
Attaching receipt images
Receipt images may be uploaded as a PDF, JPG or PNG. As always, receipts may be emailed or faxed to be attached to your expense report. If you choose to upload receipts, the maximum size for a single upload is 5 MB, and maximum size for images submitted via email is 100 MB. Using Optical Character Recognition (OCR), the system can determine the expense type of an uploaded receipt, crop an image of multiple receipts into individual receipt images, and even attach a receipt to the correct line item automatically.
Upload receipts
For draft and new expenses, you can upload PDF, JPG or PNG receipt images from the Expense Entry Screen.
On the Expense Entry Screen, click on the RECEIPTS tab. Click on UPLOAD IMAGES to attach your file(s).

- Add to image: Add a new file or additional files. If images are already attached, they will be appended.
- Replace image: Replace your existing file(s). This will also overwrite any images attached to the expense except those attached via a transaction or a Google mileage map.
- Delete image: Completely remove an image from the expense.
The image(s) will appear immediately in the Receipts tab.
MULTI-IMAGE CROPPINGFor direct upload only, Emburse's OCR software allows you to upload multiple receipts in a single image—for example, if you snapped a photo of three receipts on your desk. The software will automatically crop the uploaded image into separate images for each receipt. These will replace the original image in the system. If you wish to uncrop the images and revert to the original shot of multiple receipts, simply highlight the image in your Receipts tab and click UNCROP. (Note: This functionality is still a work in progress.)

Email or fax receipts
To attach receipt images directly to an expense report via email or fax, you must submit them with a cover page that will route them to the correct expense report. This cover page can be generated from several places within the interface.
- Faxing or emailing in receipts will overwrite any images already attached to the expense.
- If you choose to email in the receipts, PDF, JPG and PNG format files are acceptable.
- Click PDF REPORT in the lower right hand corner of the screen and select COVER PAGE. This will generate a cover page with a unique expense ID QR code.

- Print the cover page and place it in front of the receipt(s) you wish to submit.

- Send the stacked cover page and receipt(s) to Emburse by fax or by scanning and emailing them.
↦ Fax number: 214-540-1162 OR Email address: expense@chromefile.com - You will receive an email confirmation message if the submission is successful or a detailed error message if it fails.
HTML receipts
Another way to create an expense memo is by using Emburse's HTML Receipts function to generate an image of the body of an email to use as the receipt. For example, you could forward an HTML email confirmation for a rental car to have it converted into a receipt image available on your Items tab.
To do so, forward the HTML Receipt (with NO attachments) to expensememo@chromefile.com to have it converted into a receipt image. Emburse’s OCR data will extract the following data: amount, currency, item type, date and vendor.
Google mileage receipts
When users create a mileage expense via Emburse’s Google Maps tool, the image of the corresponding map is automatically attached to the expense report’s image pack.

Attaching receipts to line items
By default, all receipt images attached to a report are associated with the entire report. However, we now have the ability to associate receipts to specific line items. These images will even appear below each line item in the resulting Approval Notification Email sent to approvers. It is possible to associate multiple receipts with the same line item, but it is not possible to associate the same receipt with multiple line items.

When an image is uploaded, Emburse's imaging software will extract valid OCR data from as many of the following criteria as possible:
- Amount / Currency / Item Type / Date / Vendor
If the system is able to extract enough data, it will automatically match the image to the appropriate line item on the expense report, as long as it does not already have an image linked to it. If there are multiple matching line items, the system will attach the image to the first item it encounters that does not already have an image attached.
MANUAL LINE-ITEM ATTACHMENT- Once you have uploaded or located the image you want to use in the receipt pack, grab the image and drag it onto the line item.

- You may also select the desired line item so that it turns blue, then click LINK on the Receipts tab. However, if you are attempting to link multiple receipts with the same line item, subsequent receipts may only be attached via dragging.

- A paper clip icon on the line item indicates that it has a receipt attached. A receipt may not be attached to any other line item while it is attached to the one you selected.
When you select a line item, the first image that was associated with it will appear in the Receipts tab. To see which additional images in the receipt pack are associated with a specific line item, click the arrows in the Receipts pane to page through the images. The corresponding line item will be highlighted in blue as each receipt loads in the viewer.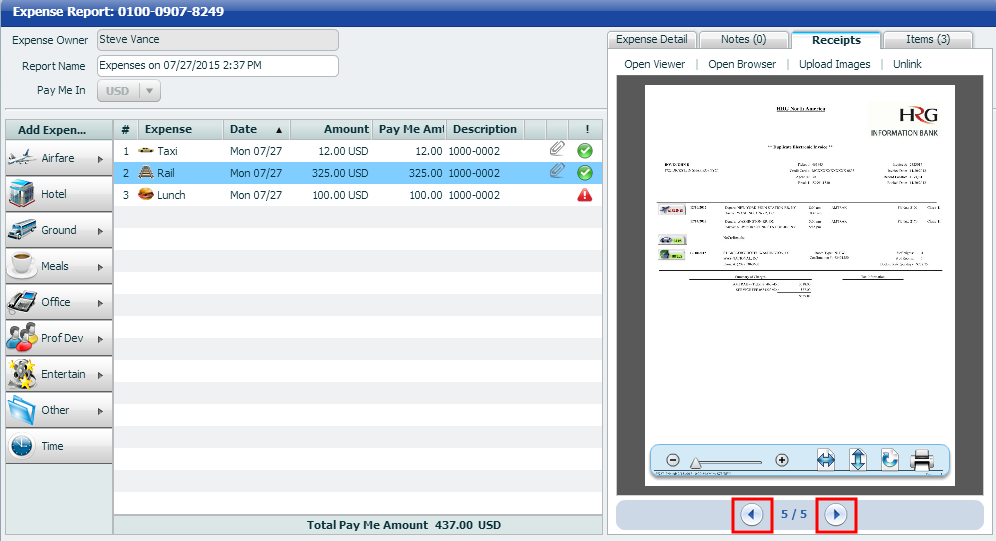
- To unlink a receipt, highlight the line item, page through the receipt pack to the desired image, and click UNLINK in the Receipts pane. The image will remain in the receipt pack and be available to attach to another line item.

Email memo transactions
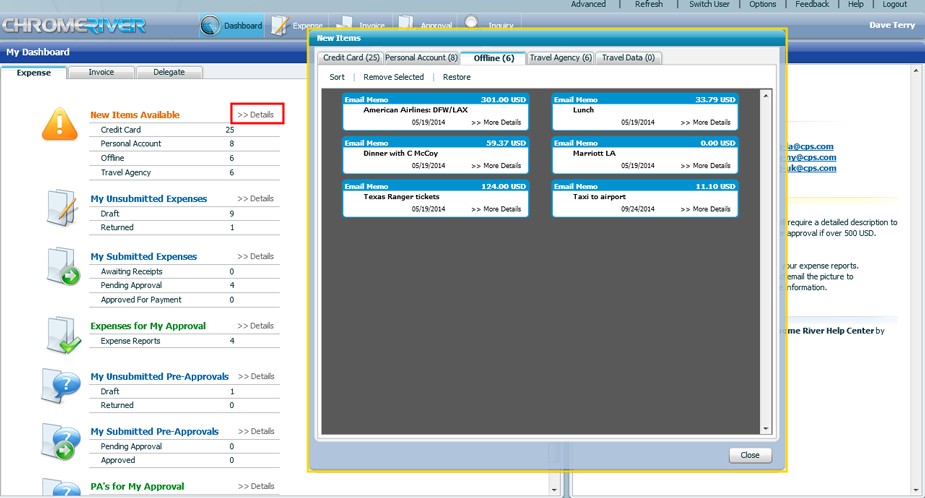
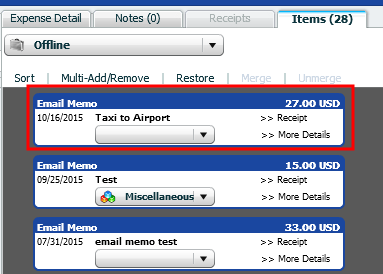
Emburse EXPENSE allows you to create new expense items via email for later attachment to an expense report in the online application. You can send a plain text email containing the pertinent details, forward an HTML email like a confirmation or receipt, or attach a receipt image to an email. If you know the Report ID of the expense report to which you want to add the expense item and/or image, you can email it directly to that report. Once it is received, you will be able to view the expense memo in the Offline folder of the Items tab when creating a new expense.

Expense memos can also be accessed via the Home Dashboard of Emburse online. Under New Items Available, click >>DETAILS and then select the OFFLINE tab.
Sending a plain text email memo
If you want to create an expense item on the go but don't have a receipt, you can send a plain text email of the details to Emburse and an item will be created for you in the Offline folder of your Items tab.
- Draft a new message containing the following information.
To: expensememo@chromefile.comFrom: your.name@your.company.comSubject: xx.xx [dollar amount] Body: Description of expense - The "From" email address must be the one associated with your account in Emburse EXPENSE online.
- The Subject should be the amount of the expense with no symbols—the corresponding currency code is optional. If you neglect to put the expense amount in the Subject line, the amount will be 0.00 when the expense appears in Emburse online.
- The body should contain the description of the expense. It will appear in the Description section of any PDF reports generated.

- Send the message to expensememo@chromefile.com.
- The expense will appear in the Offline folder of the Items tab.
Sending an HTML email memo
If you have received an HTML email confirmation or receipt for an expense, you can forward it directly to expensememo@chromefile.com to have it converted into a receipt image. The email must not have any attachments. The image created from the HTML email you forwarded will be found in the Offline folder of the Items tab.


Emburse's imaging software will extract valid OCR data from as many of the following criteria as possible and use it to populate the corresponding fields of the line item created from the email memo:
- Amount
- Currency
- Item Type
- Date
- Vendor
If you replace the subject line of the email with an amount, that number will override the amount extracted via OCR.
Sending an email memo with a receipt image
To submit receipts with your email memo expense, simply attach the images to a plain text message. For example, you can use your mobile device to take a photo of a receipt, then attach it to an email sent to expensememo@chromefile.com from the device.
Image files must be 5 MB or less—500 KB is ideal—and JPG, PNG and PDF files are all acceptable.

Emburse's imaging software will extract valid OCR data from as many of the following criteria as possible and use it to populate the corresponding fields of the line item created from the email memo:
- Amount
- Currency
- Item Type
- Date
- Vendor
If you enter the amount in the subject line of the email, that number will override the amount extracted via OCR.
The images will appear with the expense in the Offline folder of the Items tab. Each image will appear as its own email memo in the Items tab containing the corresponding information about the expense. Click >>RECEIPT to view the image.
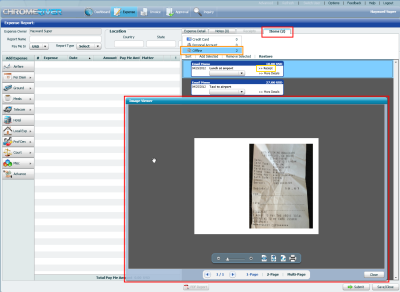
Note: If you email the image without a subject line or a description, the expense will still appear in the offline folder, but the amount will be 0.00 and the only other data will be the date of the email.
Receipt image specifications: summary
Emburse gives users multiple options for attaching receipt images to an expense reports.
Attaching receipts via Emburse EXPENSE
The Emburse application allows users and their delegates to upload receipt images in PDF, JPG and PNG format. The maximum size for a single upload is 5 MB. If you wish to add a file greater than 5 MB, either split it into sections or send it via email or fax. The total size of all images uploaded via email must be 100 MB or less.
Attaching receipts by fax or email
Users also have the option to attach receipt images by fax or email, which allows you to bypass the file-size limitation on images uploaded through the application. It is also the only way to submit images as TIFF files. Only JPGs, PDFs, PNGs and TIFFs can be accepted.
To attach receipts directly to a specific report, the Emburse cover page with unique report QR code must be included as the first page, in front of the receipts. Users may submit receipts for multiple reports simultaneously by placing the Emburse cover page for each expense report at the start of its corresponding receipt packet, like this: Cover Page A, Receipt Packet A, Cover Page B, Receipt Packet B, etc.
Attaching receipts via a mobile device
Users have the option to snap a photo of receipts with a mobile device and email it directly to Emburse. Here are a few guidelines to ensure that your image can be read by the system:
- Hold the device steady when taking the photo.
- Be sure there is no glare on the receipt that obscures the data.
- During the image-attachment process, select the size (Small, Medium, Large, Actual Size) that’s closest to 500 KB.
Troubleshooting
Submission fails: Faxed/emailed receipts trigger a confirmation email that reports the success or failure of the submission. If the submission fails, the email will list the reason—for example, no cover page or illegible QR code.
Attachment fails: Occasionally, a receipt image will not attach properly. If this occurs, the application will return the file by email to either the submitter or the firm administrator. If the file is larger than 5 MB, it will not be included as an attachment in the email.
QR code issues: If a receipt is returned but appears to be formatted properly, make sure the QR code is clear and not obstructed. In some cases, the QR code may contain a significant amount of “noise”—the variation of brightness or color information in an image that appears as randomly occurring black or white pixels. If the QR code is not able to be read by the Emburse QR code reader, it may reject the file.
Rescanning or reprinting the cover page and receipts at a higher resolution with the quality controls set at “fine” will typically resolve this issue. Emburse’s recommended settings are Black and White, 300 dpi, and the accepted file types are JPG, PNG, TIFF and PDF.
Approvals
Emburse’s line-item image functionality is especially helpful for approvers because it takes them directly to the receipt image corresponding to each line item.
In-app approval
When an approver clicks on a line item that has an image attached to it, that image will automatically appear in the Receipts tab. If there are numerous images attached to the expense report, this saves the approver from having to click through all of them to find the relevant receipt. Conversely, as the approver clicks through the images on the Receipts tab, their corresponding line items will be highlighted on the report.

Email approval
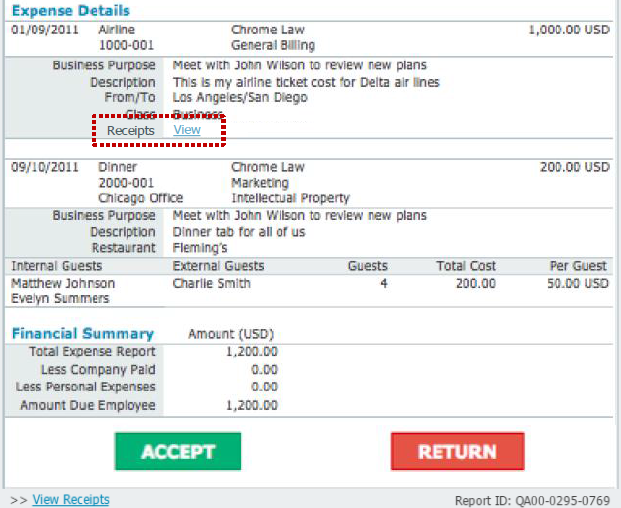
Approval emails for expense reports containing line-item images have a VIEW link in the Expense Details section for each line item with a corresponding receipt. The link opens the receipt pack PDF and scrolls directly to the corresponding receipt.
Guidance
- Pre-Approvals
- Recall (Expense Report)
- Mileage Widget
- Christopherson to Chrome River Data Feed
- Business Meal – Guest Selector
Pre-Approvals
Chrome River pre-approvals now have their own dedicated dashboards, similar to the Expense Dashboard, including My Unsubmitted Pre-Approvals and My Submitted Pre-Approvals, and will no longer be featured under New Items Available.
Please visit the dedicated page for these enhancements: Pre-Approvals
Recall (New Feature for Expense Reports)
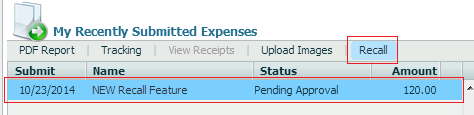
Travelers and assigned delegates can now recall a submitted expense report as long as no line items on the report have been fully approved. This means users will no longer need to contact Travel Services to have a submitted report reset. Using the Recall feature will not delete any notes on the report. The Recall button can be found in the menu at the top of the My Recently Submitted Expenses grid, and will be enabled when users select an eligible report.
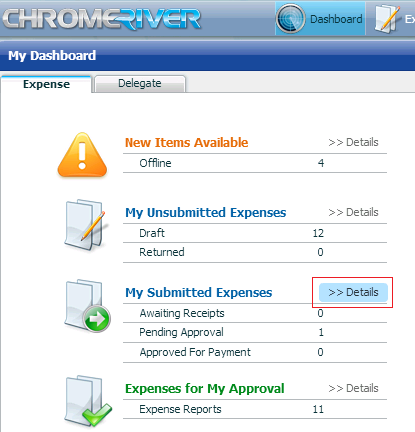
To recall an expense report, click the >> Details tab under My Submitted Expenses.
Click the report (where no line items have been fully approved). The report will turn blue and the Recall button will become available.
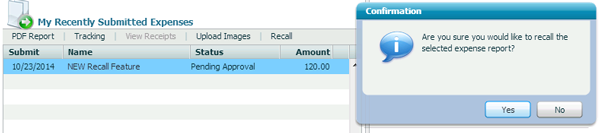
A confirmation window will appear. Click Yes to reset the report.
Please note: using the recall feature will detach/unlink any pre-approvals from the expense report. This allows users to reattach them as needed upon re-submission.
Mileage Widget
Our new mileage widget allows employees to enter multiple destinations using the >> Distance Wizard feature, and destinations entered will now appear on the Full PDF Report.
When users open the employee mileage widget, enter the date of travel and select a rate. The Current Mileage rate will populate the correct IRS rate based on the Receipt Date.
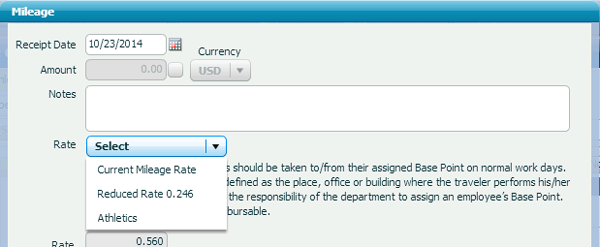
Decide whether you would like to enter a total number of miles (ideal for departments who keep monthly mileage logs), or select the Distance Wizard to enter multiple destinations.
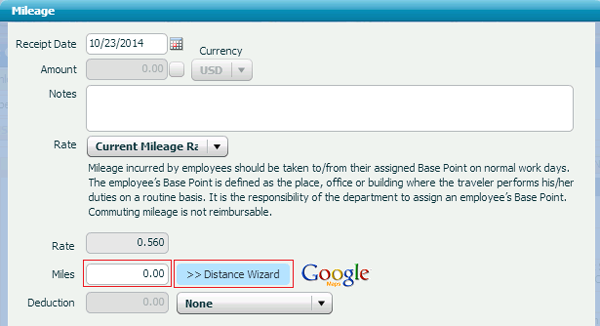
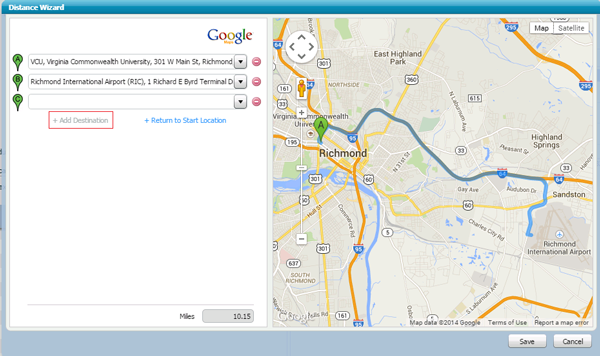
If Distance Wizard is selected, enter point A and point B. If additional destinations are required, click +Add Destination.
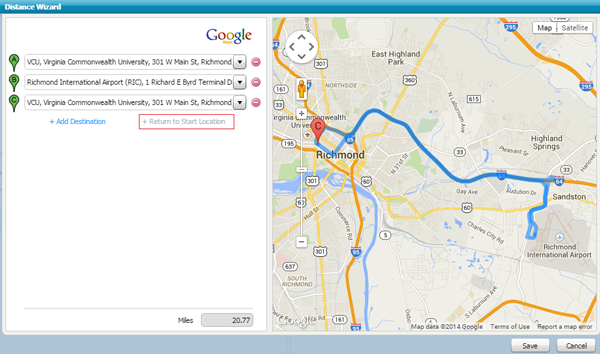
If you would like to show a round trip, enter point A and point B, then click +Return to Start Location (the Distance Wizard will populate point C with your original address). When finished, click Save.
Destinations entered in the mileage widget will appear in the Full PDF Report.
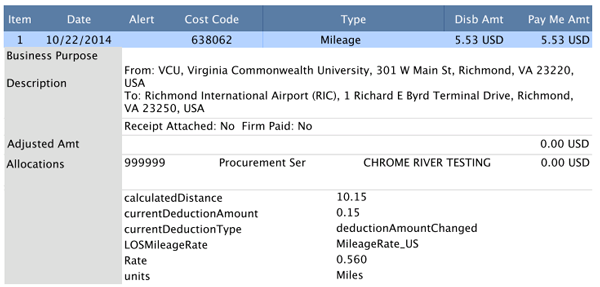
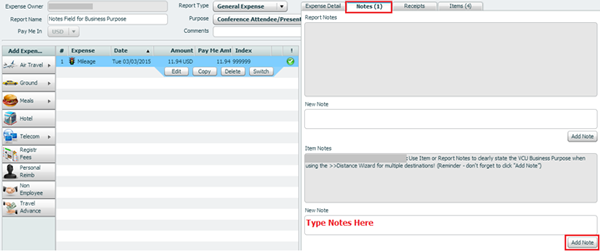
As a reminder, a business purpose is required for mileage reimbursements. If you use the >> Distance Wizard, include the business purpose in the Notes section of your expense report.
If you enter a total number of miles (ideal for mileage logs), include the business purpose in the Notes box within the mileage widget.
Data Feed from Christopherson to Chrome River
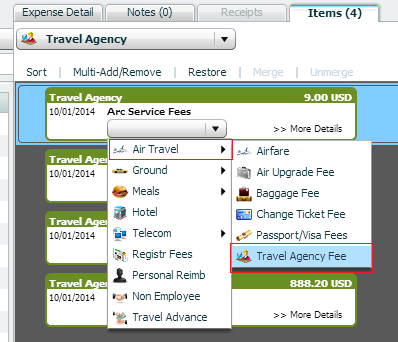
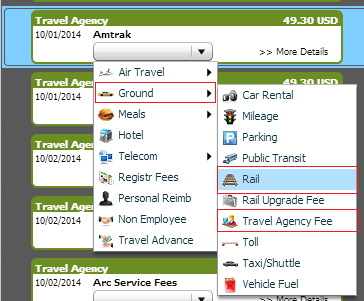
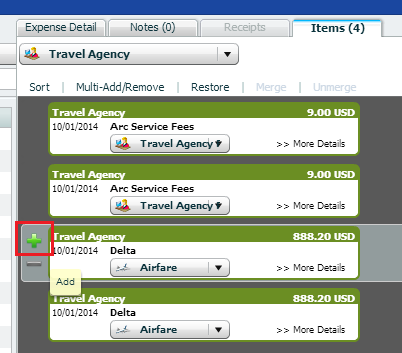
Travelers and assigned delegates can now add Christopherson Business Travel booked air, rail, and agency fees to an expense report. To do so, open a new expense report, click the Items tab, and from the dropdown menu select Travel Agency. Data fed from Christopherson to Chrome River for VCU employees will be found here.

From the dropdown menu, select the item type you need. For example, to identify an Airfare Booking Fee, select Air Travel, then Travel Agency Fee.
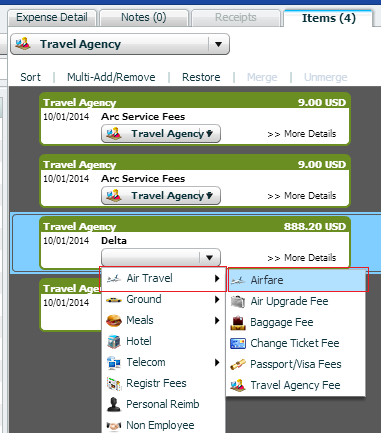
For airfare, select Air Travel, then Airfare.
For rail fare and fees, select Ground, then Rail or Travel Agency Fee.
When ready to add the expense to the report, hover over the item and click the green plus symbol.
The expense will pre-populate from Christopherson data. Click Save.
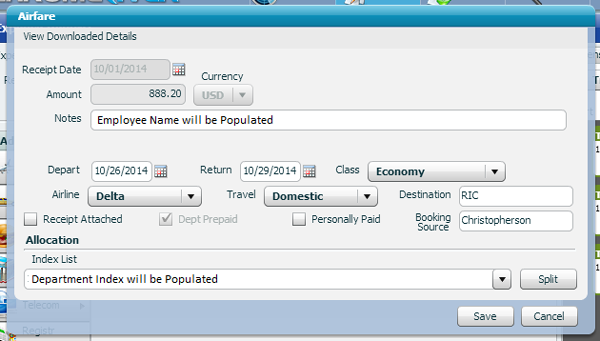
Please note: the Christopherson to Chrome River data feed is processed every Monday for transactions posted the previous week.
Business Meal – Guest Selector
To support policy compliance, users now enter business meal attendee information within the business meal widget. This enhancement allows users to differentiate between internal VCU employees and external guests.
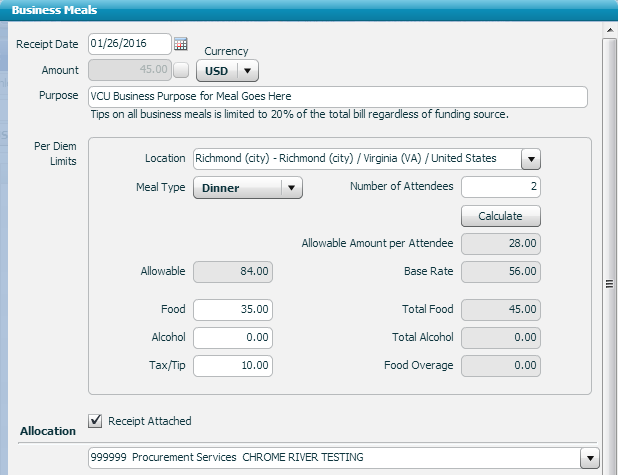
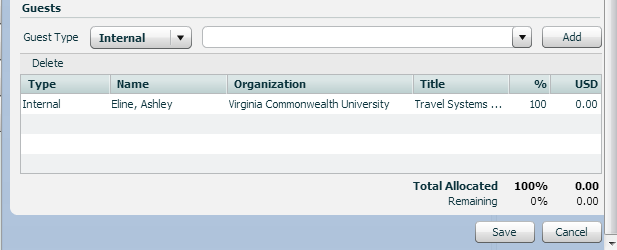
Internal VCU employees: Keep Guest Type set to “Internal,” type the name in the box, select the populated result, then click Add. (Note: you do not need to adjust the percentage or dollar amount; this does not impact the widget.)
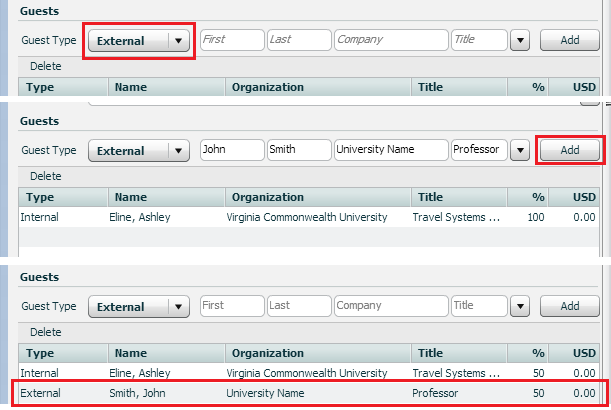
External guests: Change Guest Type to “External,” then enter the guest’s first and last name, company name, and title. Click Add.
For VCU policy information about business meals, please visit:
Run travel and reimbursement reports
Fiscal Approvers in Emburse have access to run travel and reimbursement reports. Internet Explorer is the optimal browser for this tool.
To access the reporting tool: log into Emburse, click Administration and then Analytics Reporting. To access the Help section for standard and ad hoc reports, click Help once logged into Emburse, and then “Emburse ANALYTICS.”
- Pre-Approval Request Tracking (Emburse)
- Inquiry: My Approvals (Emburse)
- Open Approvals (Emburse)
- Submitted Expense Reports (Emburse)
- Unsubmitted Expense Reports (Emburse)
- Expense Report Tracking (Emburse)
- Expense Analysis (Emburse)
Pre-approval request tracking (Emburse)
-
Log into Emburse and launch reporting.
- Log in to Emburse. (Bookmark this page for quick access)
- In the menu at the top, select Advanced > Analytics Reporting.
-
Load the report and specify filters.
- Under the Standard Reports tab, in the Reports list at the left side of the screen, select Pre-Approval Request Tracking.
- Specify the selection criteria, such as the Submit Date, Expense Owner, and/or Status. Tip: Type in a few characters and click on the magnifying glass to see the available options for a specific filter.
- Click the Find Requests button. This loads a list of pre-approvals. Keep the default selection ("All") or select a specific pre-approval (Ctrl+ or Shift+ for multiple items).
-
Select an output type, view report results, and refine.
- Select the output type HTML Active Report. This report type opens quickly within a new browser tab and provides additional options to filter and sort.
- Click the Tracking button to view report results.
- Click on the triangle to the right of any column name (such as Approver or Approval Status) to sort or filter.
- Additional functions such as charting, pivot tables, and export options are also available by right-clicking on the triangle.
Inquiry: My Approvals (Emburse)
Use Inquiry to show My Approvals (Approved and Returned). Employees who have profiles within Emburse, and have approval responsibilities, can run Inquiry reporting to see approved and returned expense items for selected date ranges, and specific expense owners. Inquiry: My Approvals also allows you to View Expense Reports, Receipts, and copy expenses to paste into other documents.
-
Log into Emburse and select inquiry.

-
From your Inquiry Dashboard, select → My Approvals and click Run Report.

-
Determine the criteria you would like Emburse to search.

-
You have a series of options available for each expense report. Click on the specific line item for further information.
- View Expense Report PDF: Cover Page, Full Report, Report with Notes

- View Receipts for accompanying expense report.

- If you choose to use the Group Option, the Copy to Clipboard and View PDF features are available for use.

Summary: An overview of Spent and Approved Amounts
All and Details: Expense Owner, Expense, Report Name, Submit Date, Action Date, Action, Spent Amount, Approved Amount (for each line in the specified report) - View PDF

Summary: a basic view of the Expense Report name, spent amount, and approved amount.

All and Details: an advanced PDF of expense owner, expense type, report name, submitted date, action date, action, spent amount and approved amount.

- View Expense Report PDF: Cover Page, Full Report, Report with Notes
Open Approvals (Emburse)
-
Log into Emburse and launch reporting.
- Log in to Emburse. (Bookmark this page for quick access)
- In the menu at the top, select Advanced > Analytics Reporting.
-
Load the report and specify filters.
- Under the Standard Reports tab, in the Reports list at the left side of the screen, select Open Approvals.
- Specify the Office Code (the three-digit code that represents your school or business unit in Banner) or Department Code (four digits). Alternately, leave these filter fields blank to view all results, noting that this may result in a longer run time for the report.
- Remove unnecessary report columns (such as Rule ID) by selecting the column name in the Included Columns pane and clicking the Left Arrow button. Columns can also be rearranged using the Up and Down Arrow buttons.
- Select a Group Column, such as Approver or Department (optional).
-
Select an output type, view report results, and refine.
- Select the output type HTML Active Report. This report type opens quickly within a new browser tab and provides additional options to filter and sort.
- Click the Run Report button to view report results.
- Right-click on the triangle to the right of any column name (such as Approver Name or Department) to sort or filter.
- Additional functions such as charting, pivot tables, and export options are also available by right-clicking on the triangle.
Submitted Expense Reports (Emburse)
-
Log into Emburse and launch reporting.
- Log in to Emburse. (Bookmark this page for quick access)
- In the menu at the top, select Advanced > Analytics Reporting.
-
Load the report and specify filters.
- Under the Standard Reports tab, in the Reports list at the left side of the screen, select Submitted Reports.
- Select a date range from the drop-down menu or specify a custom date range.
- Add additional Report Columns, such as Owner Office or Expense Creator Name, if desired.
- Select a Group Column, such as Expense Owner Name or Expense Creator Name (optional).
-
Select an output type, view report results, and refine.
- Select the output type HTML Active Report. This report type opens quickly within a new browser tab and provides additional options to filter and sort.
- Click the Run Report button to view report results.
- Review expense report detail (scanned receipts, allocation summary, and business purpose) by selecting View (in the last column) for any line item. Note that if you select Cover Page or Full Report from this dropdown, the allocation summary represents the index that is specified within Emburse. Always refer to Banner for final allocation amounts, indexes, and accounts.
- Additional options such as filters, charts, pivot tables, and sort are available by right-clicking on the triangle to the right of the column name.
Unsubmitted Expense Reports (Emburse)
-
Log into Emburse and launch reporting.
- Log in to Emburse. (Bookmark this page for quick access)
- In the menu at the top, select Advanced > Analytics Reporting.
-
Load the report and specify filters.
- Under the Standard Reports tab, in the Reports list at the left side of the screen, select Unsubmitted Reports.
- Specify the selection criteria, such as the Date Range, Office Code (the three-digit code that represents your school or business unit in Banner), or Expense Owner. Tip: Type in a few characters and click on the magnifying glass to see the available options for a specific filter.
- Remove unnecessary Report Columns (such as Currency Code) by selecting the column name in the Included Columns pane and clicking the Left Arrow button. Columns can also be rearranged using the Up and Down Arrow buttons.
- Select a Group Column, such as Expense Owner or Office Name (optional).
-
Select an output type, view report results, and refine.
- Select the output type HTML Active Report. This report type opens quickly within a new browser tab and provides additional options to filter and sort.
- Click the Tracking button to view report results.
- Review the unsubmitted expense report detail (scanned receipts, allocation summary, and business purpose) by selecting View (in the last column) for any line item. Note that if you select Cover Page or Full Report from this dropdown, the allocation summary represents the index that is specified within Emburse. Always refer to Banner for final allocation amounts, indexes, and accounts.
- Additional options such as filters, charts, pivot tables, and sort are available by right-clicking on the triangle to the right of the column name.
Expense Report Tracking (Emburse)
-
Log into Emburse and launch reporting.
- Log in to Emburse. (Bookmark this page for quick access)
- In the menu at the top, select Advanced > Analytics Reporting.
-
Load the report and specify filters.
- Under the Standard Reports tab, in the Reports list at the left side of the screen, select Expense Report Tracking.
- Specify the selection criteria, such as the Submit Date, Expense Owner, and/or Approver. Tip: Type in a few characters and click on the magnifying glass to see the available options for a specific filter.
- Click the Find Reports button. An additional Parameters section appears.
- Click the Run button. This loads a list of expense reports. Keep the default selection ("All") or select a specific report (Ctrl+ or Shift+ for multiple items).
-
Select an output type, view report results, and refine.
- Select the output type HTML Active Report. This report type opens quickly within a new browser tab and provides additional options to filter and sort.
- Click the Tracking button to view report results.
- This report automatically groups by Expense Report ID, and shows each line item and each step in the approval process. The most recent step in the approval process appears on the bottom row(s) for any specific Expense Report ID. Review the expense report detail (scanned receipts, allocation summary, and business purpose) by selecting View (in the last column) for any line item. Note that if you select Cover Page or Full Report from this dropdown, the allocation summary represents the index that is specified within Emburse. Always refer to Banner for final allocation amounts, indexes, and accounts.
- Additional options such as filters, charts, pivot tables, and sort are available by right-clicking on the triangle to the right of the column name.
Expense analysis (Emburse)
-
Log into Emburse and launch reporting.
- Log in to Emburse. (Bookmark this page for quick access) Note: This report only works in Internet Explorer 9.x on the PC. If using a different platform or browser, similar data can be obtained (visually) through the Dashboard tab.
- In the menu at the top, select Advanced > Analytics Reporting.
-
Load the report, specify filters, and organize columns.
- Under the Standard Reports tab, in the Reports list at the left side of the screen, select Expense Analysis.
- Specify the selection criteria, such as the Submit Date, Office (school or business unit), Expense Category, and/or Report Status. This report has many filters available. Click on the edge of the Filters pane to scroll down to additional filters such as Expense Owner and Matter. Tip: Type in a few characters and click on the magnifying glass to see the available options for a specific filter.
- Add additional columns to this report by selecting a column name in the Available Columns pane and clicking the Right Arrow button. Rearrange columns by selecting a column name in the Included Columns list and clicking the Up or Down Arrow button. Note: the term "Matter" (Matter Number, Matter Name) refers to the VCU Banner Index.
-
Select an output type, view report results, and refine.
- Select the output type HTML Active Report. This report type opens quickly within a new browser tab and provides additional options to filter and sort.
- Click the Tracking button to view report results.
- Additional options such as filters, charts, pivot tables, and sort are available by right-clicking on the triangle to the right of the column name.